Using Activiti with Spring Boot 2.x
In this post, we’re going to go through an example using Activiti with Spring Boot. Activiti is an open-source Business Process Model and Notation (BPMN) engine. I’ve always loved process. How people do their work is fascinating to me. Combining Java programming with business process? Yes, please!
Gradle Configuration
Activiti 7 includes support for Spring Boot 2.x, so that’s what we’ll be using. There is a complication in that it’s apparently compiled against Java 11. So in addition to the Gradle dependencies that we’ll be getting to in a minute, we’ll also need to configure our application to work with Java 11.
compileJava {
   options.fork = true
   options.forkOptions.javaHome = file('c:\\Apps\\jdk-11.0.2')
   targetCompatibility = '11'
   sourceCompatibility = '11'
}

def activiti_version='7.0.0.GA'
Now let’s bring in the Spring Boot starter for Activiti.
implementation "org.activiti:activiti-spring-boot-starter:${activiti_version}"
Event Logging Process
For our example, we’ll set up an Event Monitoring process. Basically, an event is entered (manually) and this kicks off our process. From there the user has a task to evaluate it, where they can add a comment and then if the original severity is HIGH or CRITICAL, the user is also assigned a task to investigate. Otherwise, the process is over.
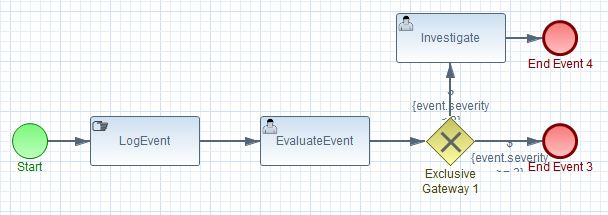
This diagram was created using the Eclipse BPMN2 Modeler plugin, but there are other tools available. The important thing is that the file ends in .bpmn20.xml and that it be placed in src/main/resources/processes.
Security Configuration
The Activiti starter uses Spring Security, which makes sense since the application needs users to which we’ll assign tasks. That being said, the security adds an extra layer of complication on our simple introductory application. So we’re going to set up some in- memory users while noting that we would not do that in production. A production application would be secured according to its own requirements.
So we’re going to start by creating a class for our security configuration.
@Configuration
@EnableWebSecurity
public class ActivitiApplicationConfig extends WebSecurityConfigurerAdapter {
Next, we’ll set up our own UserDetailsService with a couple of in-memory users. The important detail here is that the users have special roles for use with Activiti: ROLE_ACTIVITI_USER and ROLE_ACTIVITI_ADMIN.
@Bean
public UserDetailsService myUserDetailsService() {

   InMemoryUserDetailsManager inMemoryUserDetailsManager = new InMemoryUserDetailsManager();

   String[][] usersGroupsAndRoles = {
      {"user", "password", "ROLE_ACTIVITI_USER"},
      {"admin", "password", "ROLE_ACTIVITI_ADMIN"},
   };

   for (String[] user : usersGroupsAndRoles) {
      List<String> authoritiesStrings = Arrays.asList(Arrays.copyOfRange(user, 2, user.length));
      inMemoryUserDetailsManager.createUser(new User(user[0], passwordEncoder().encode(user[1]),
         authoritiesStrings.stream().map(s -> new SimpleGrantedAuthority(s)).collect(Collectors.toList())));
   }

   return inMemoryUserDetailsManager;
}
We’re also going to configure some basic security here too.
@Override
protected void configure(HttpSecurity http) throws Exception {
   http
      .csrf().disable()
      .authorizeRequests()
      .anyRequest()
      .authenticated()
      .and()
      .httpBasic();
}
Event
With our security configuration out of the way, let’s take a look at the Event class that represents the events we’re monitoring. In addition to the expected JPA annotations, there are a couple of other things to note about our Event class. We’re going to be adding our entire event onto our process as a variable. In order to access it, it needs to implement Serializable. Additionally, in order to have Jackson handle the timestamp properly, we use the JsonSerialize annotation to tell it to use the LocalDateTimeSerializer.
@Entity
public class Event implements Serializable {
   private static final long serialVersionUID = 2400917985911399656L;

   @Id
   @GeneratedValue(strategy=GenerationType.AUTO)
   private Long id;
   private String description;
   @JsonSerialize(using = LocalDateTimeSerializer.class)
   private LocalDateTime eventTimestamp;
   private int severity;
   private String comment;

   // Standard Getters/Setters and toString
}
Process Definition
Because we placed our BMPN file for our process in src/main/resources/processes and the name ends in bpmn20.xml, Activiti will pick up our Process Definition automatically when the application starts. I doubt we’d do this in a real application, but for the sake of learning about Activiti, we’re going to create a controller method for listing Process Definitions. The application contains just one controller, EventMonitorController.
Thanks to the Spring Boot starter for Activiti, we can autowire our ProcessRuntime instance.
@Autowired
private ProcessRuntime processRuntime;
Now, let’s look at our controller method. We use the ProcessRuntime instance to get a Page containing our process definitions. We use the getContent method to get our ProcessDefinitions and convert them into a collection of ProcessDefinitionDto.
@RequestMapping("/")
@RolesAllowed({ "ROLE_ACTIVITI_USER", "ROLE_ACTIVITI_ADMIN" })
public String listProcessDefinitions(Model model) {
   Page<ProcessDefinition> processDefinitionPage = processRuntime.processDefinitions(Pageable.of(0, 10));

   List<ProcessDefinitionDto> pdDtos = processDefinitionPage.getContent().stream().map(pd -> new ProcessDefinitionDto(pd.getId(), pd.getDescription(), pd.getFormKey(), pd.getKey(), pd.getName(), pd.getVersion())).collect(Collectors.toList());
   model.addAttribute("processDefinitions", pdDtos);
   return "listProcessDefinitions";
}
It’s not really user-friendly, but here’s our list of ProcessDefinition.

Process Instances
To start an instance of our event monitoring process, we’re taken to the page for entering an event. That event is saved and stored in the instance we start up.
Let’s look at the logEvent method in our EventService class. This method has two parts: the familiar one where we create and save our Event object and then our call to start a process instance with this event. In order to pass the Event and the currently logged in user name to our process, we add them to a map that we’ll pass as variables. Activiti has a ProcessPayloadBuilder class that we use when we’re creating our instance. We provide the ProcessDefinitionId, the ProcessDefinitionKey, a unique name that we create from the description and date and the variables map we discussed a moment ago.
 public EventDto logEvent(EventDto eventDto) {
    Event event = new Event();
    event.setDescription(eventDto.getDescription());
    event.setEventTimestamp(eventDto.getEventTimestamp());
    event.setSeverity(eventDto.getSeverity());

    eventRepository.save(event);

    Map<String, Object> eventMap = new HashMap<>();
    eventMap.put("event", event);
    eventMap.put("activeUser", getActiveUsername());

    ProcessInstance processInstance = processRuntime.start(ProcessPayloadBuilder
          .start()
          .withProcessDefinitionId(eventDto.getEventProcessDefinitionId())
          .withProcessDefinitionKey(EVENT_PROCESS_KEY)
          .withName(String.format("Event Monitor (%s - %s)", eventDto.getDescription(), Instant.now().toString()))
          .withVariables(eventMap)
          .build()
    );

    eventDto.setId(event.getId());
    return eventDto;
 }
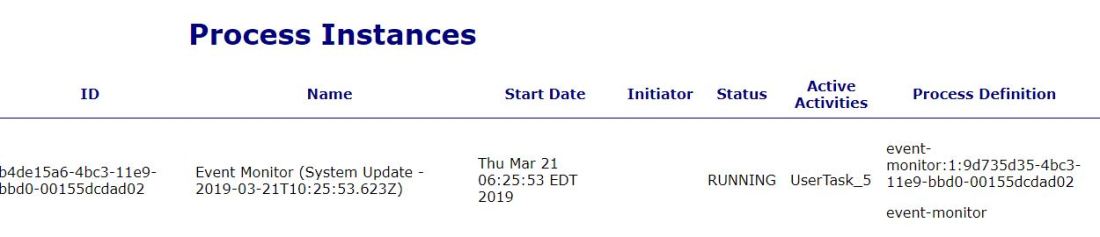
Once we’ve saved our Event and fired up our instance we’re going to list our active instances. As with the Process Definitions, this isn’t normally a list we’d be showing the user, but it’s useful to illustrate how to list them, so we’re doing it that way in our demo.
Listing Process Instances is very similar to listing Process Definitions.
@RequestMapping("/instances")
@RolesAllowed({ "ROLE_ACTIVITI_USER", "ROLE_ACTIVITI_ADMIN" })
public String listProcessInstances(Model model) {
   List<ProcessInstance> processInstances = processRuntime.processInstances(Pageable.of(0, 10)).getContent();

   List<ProcessInstanceDto> instanceDtos = processInstances.stream().map(instance -> new ProcessInstanceDto(instance.getId(), instance.getName(), instance.getDescription(), instance.getStartDate(), instance.getInitiator(), instance.getBusinessKey(), instance.getStatus().toString(), instance.getProcessDefinitionId(), instance.getProcessDefinitionKey(), processRuntime.processInstanceMeta(instance.getId()).getActiveActivitiesIds())).collect(Collectors.toList());
   model.addAttribute("instances", instanceDtos);

   return "listInstances";
}
Here’s our newly started process. You can see there’s a lot of internal type IDs that we wouldn’t necessarily be showing a user in a real application.
Tasks
Something we might show a user is a list of their active tasks. So once we kick off an event monitoring process, the signed in user is assigned the next task in the process which is to evaluate the event. (Which in the case just gives them an opportunity to add a comment.)
Let’s look at the findUserTasks method in our EventService. Just like the ProcessRuntime, we can autowire our TaskRuntime into our service. The tasks method returns the active tasks for the currently logged in user. Just like with Process Definitions and Instances we get a Page of tasks and use getContent to get a List we can work with.
public List<TaskDto> findUserTasks() {
   Page<Task> tasks = taskRuntime.tasks(Pageable.of(0, 10));

   List<TaskDto> taskDtos = tasks.getContent()
      .stream()
      .map(task -> new TaskDto(
         task.getId(), task.getOwner(), task.getAssignee(),
         task.getName(), task.getDescription(), task.getCreatedDate(),
         task.getClaimedDate(), task.getDueDate(), task.getPriority(),
         task.getProcessDefinitionId(), task.getProcessInstanceId(),
         task.getParentTaskId(), task.getStatus().toString(), task.getFormKey(),
         task.getCompletedDate(), task.getDuration())).collect(Collectors.toList()
      );
  return taskDtos;
}
This is what the user will see.

When the user clicks Review, we get the EvaluateEvent task from the TaskRuntime and extract the Event from it. We load all that into a DTO and take the user to a page where they can add their comment.
Let’s look at our findTaskById method in EventService. We first load the Task out of the TaskRuntime using the ID provided and then extract the variables out of our ProcessRuntime by the ProcessInstanceVariableId. Our Event is serialized as it’s stored in the ProcessInstance, so we’ll get a Jackson ObjectNode and then deserialize it into an Event.
public EventDto findTaskById(String taskId) {
   Task task = taskRuntime.task(taskId);
   ProcessInstance instance = processRuntime.processInstance(task.getProcessInstanceId());
   List<VariableInstance> variables = processRuntime.variables(new GetVariablesPayload(task.getProcessInstanceId()));
   EventDto eventDto = new EventDto(0L, "", null, 0, instance.getProcessDefinitionId(), instance.getId(), task.getId());
   if (variables != null) {
      for (Iterator<VariableInstance> it = variables.iterator(); it.hasNext();) {
         VariableInstance vi = it.next();
         if (vi.getName().equals("event")) {
            ObjectNode node = vi.getValue();
            Event event = objectMapper.convertValue(node, Event.class);
            eventDto = new EventDto(event.getId(), event.getDescription(), event.getEventTimestamp(), event.getSeverity(), instance.getProcessDefinitionId(), vi.getProcessInstanceId(), task.getId());
            break;
         }
      }
   } else {
      LOG.debug("No Event found");
   }
   return eventDto;
}
Let’s look at how we complete a task in the completeTask method in EventService. This is also two part in that we first update the Event with the comment and then complete our Task.
public EventDto completeTask(EventDto eventDto) {
   Event event = eventRepository.getOne(eventDto.getId());
   event.setComment(eventDto.getComment());
   event.setSeverity(eventDto.getSeverity());
   eventRepository.save(event);

   taskRuntime.complete(TaskPayloadBuilder
      .complete()
      .withTaskId(eventDto.getTaskId())
      .build()
   );

   return eventDto;
}
Once the user enters a comment and saves their Event, the get returned to their task list. If the Event had an initial Severity of HIGH or CRITICAL, the task list should have an Investigate task. Otherwise, the process ends and their task list will be empty.
Conclusion
In this post, we’ve seen how to configure and use Activiti 7 with Spring Boot 2.x. We walked through listing Process Definitions and Instances and how to deal with User Tasks. We’ve really only just brushed the surface of what we can do with Activiti and Spring. Activiti can be configured to persist to a database (our example just uses the built-in H2 DB), use more production-ready security, and handles much more complex business processes.
The full example code is available on GitHub.

Excellent Article. it helped me to learn Activiti . Thank you so mush
LikeLike
Thank you! I’m glad to hear that it helped.
LikeLike
Hello Amy ,
I am trying to exclude spring security dependency from Actviti starter . it is still referring them. Any clue
Caused by: java.io.FileNotFoundException: class path resource [org/springframework/security/config/annotation/method/configuration/GlobalMethodSecurityConfiguration.class] cannot be opened because it does not exist
LikeLike